Column Plant
Works Operating Procedure
for Column Plant
Operation Location
ChemerG
Purpose
To efficiently and safely operate column plant
Hazards and Risks
- Chemical spills
- Over-pressurized
- Respiratory problems
- Eye irritation
- Overhead fixed hazards
Personal Protective Equipment (PPE) Required
- Slip resistant safety boots
- Eye protection i.e. googles and face shield
- Chemical and Flame-resistant overalls
- Respirator
- Gloves
- Bump cap
Plant and Equipment
- Column
- Condensers and heat exchangers
- Reflux pot
- Reactor
- Decanter
- Scrubber
- Reboiler
- Diaphragm pump
- Pipes
- Receiving/storage vessels
Emergency Shutdown Procedures
In case of an Emergency then shutdown as follows:
- Close steam crown valve.
- Close the steam control valve.
Emergency 1: Fire Response
If possible do the following:
- Halt the entire operation that was taking place.
- Switch off air supply to pump.
- Close valve from the suction point of the pump.
- Close all outlet valves and inlet valves.
- Close all outlet and inlet valves.
- Alert others.
- Open the fire monitor to turn on the fire engine, thereby sounding the fire alarm.
- If the flames are small and controllable, use the nearest appropriate fire extinguisher for the type of fire taking place to extinguish the flames, only if trained to do so.
- If the flames are uncontrollable, evacuate the area using the safest route to get to the nearest assembly point.
- Wait for further instructions.
Emergency 2: Burst or fitting failure
- Halt the entire operation that is taking place.
- Switch off air supply to pump.
- Close outlet valve from the point of suction.
- Close the inlet valve from the discharge point.
- Disconnect pipes from both suction and discharge points.
Emergency 3: Chemical Spill Response:
- Halt the operation that was taking place.
- Contain the spill.
- Cleanup the spill into containers e.g. open top drums.
- Use an absorbent to absorb the remainder of the chemical (if necessary).
- Once the chemical is fully absorbed, cleanup the working area.
Emergency 4: Exposure Response:
- Use eyewash stations or safety showers for a minimum of 15 minutes to thoroughly flush the chemical.
- Carefully remove any clothing that may have come into contact with the chemical to prevent further exposure.
- Seek medical attention immediately.
Procedures
Before Start Up
- Prepare a batch of the product that will be loaded.
- Ensure that the steam crown valve and the steam control valve are closed.
- Ensure that the kettle is clean and empty.
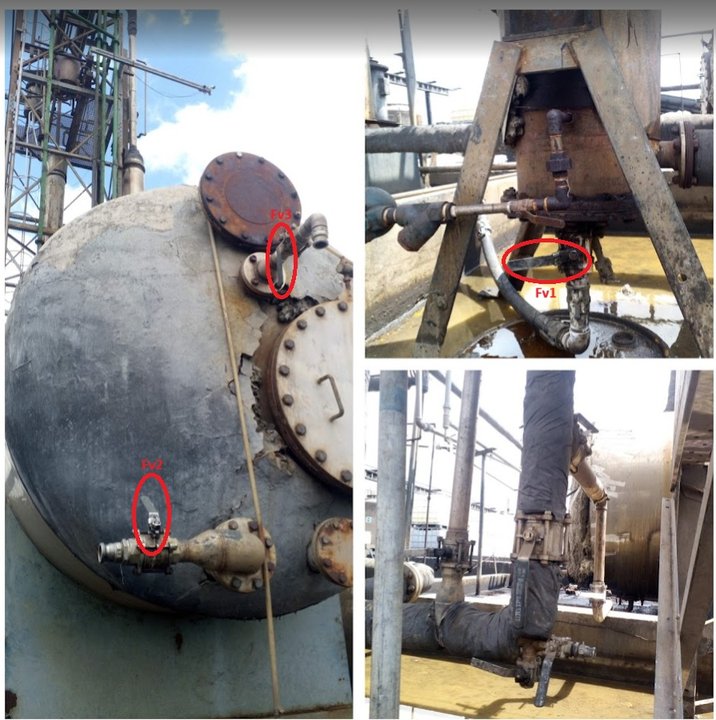
- Check that feed valves Fv1, Fv2 and Fv3 are closed.
- Fv1 also acts as an outlet valve when draining bottoms from the kettle.
- Given the position of Fv2 it is unable to act as an outlet valves because the product will not be drained completely.
- Fv3 is rarely used depending on the product that is going to be loaded in the kettle or the product running in the plant.
- The valve above feed valve 2 (Fv2) is used to release vacuum pressure that might have been. created in the kettle as the plant was running (vacuum pressure is released after the current batch that was running in the plant is through).
- It is also used to circulate the product in the kettle from top to bottom depending on the product

- Ensure that outlet valves 1 and 2 are closed to ensure that the product does not go into the vacuum plant.
- Outlet valves 1 and 2 are also known as feed valves Fv3 and Fv4 because they are inlet valves for the vacuum plant.
- Ensure that outlet valves 3 and 4 to prevent the product from going into the Black tank.
- Open outlet valves 3 and 4 only when draining the kettle into the Black tank.

- Crack open the butterfly valve to ensure that cooling water is present.
- If the flow is present when cracking the valve you will hear the sound of the flow being constricted.
- Gently touch the pipe to check if it's changing from being warm to being cold, this shows that cooling water is present in the system.
Start Up
- Connect suction pipe from the storage tank outlet valve to the diaphragm pump.
- Connect the outlet pipe from the pump to the bottom feed valve Fv1 or the middle feed valve Fv2.
- Follow the standard earthing procedure.
- Open bottom feed valve Fv1.
- Open the storage tank outlet valve.
- Turn on pump.
- Use the measuring gauge to monitor the level of product being loaded in the kettle.
- Load the kettle to a maximum of 13 000litres.
- Once the kettle has reached its maximum level, close the storage tank feed valve and allow the pump to blow for at least 30 seconds.
- Switch off pump and open close bottom feed valve Fv1.
- Open the steam crown valve.
- Open the steam control valve to adjust the steam to the desired pressure.
- Start a new log sheet.
- Create a new work order on the system.
Operating/Running
- Fill in log sheet after every two hours.
- Monitor the kettle temperature on the panel as well as the kettle temperature gauge.
- Ensure that there are no leaking pipes.
- Connect a pipe on the distillate outlet valve that leads to the storage vessel.
- Follow the standard earthing procedure.
- Insert a non-return valve to the storage tank feed valve if running in a storage tank.
- If product will be running in IBCs place the discharge pipe into the IBC with the aid of a fitting and an earthing cable.
- Once the product starts flowing, check the product flow on the flowmeter/flow gauge.
- Use the control steam valve to adjust the steam pressure to prevent pressurized flow and prevent the product from surfacing in the scrubber.
- Increase steam pressure to increase the flow of the product and decrease steam pressure to decrease the flow of the product.
- Once the product flow starts to decrease, gradually increase the steam pressure to increase the flow of the product (product dependent).
- Gradually increase the steam pressure until the product stops flowing or/and the desired purity or volume of the product.
- Use the measuring gauge to observe the amount of product left in the kettle.
- Once the amount of product left in the kettle is low and there's no product flowing, shut down plant.
Shut Down
- Close the steam control valve
- Close the steam crown valve
- Leave plant to cool until the top kettle temperature is 65DegC
- Once the temperature drops, drain the kettle completely
After Shutdown
- In a case where the product's bottoms are to be transferred to the Black tank immediately open the outlet valves leading to the Black tank
- If the bottoms are being drained in an IBC, use a diaphragm pump to drain the bottoms
- Connect the suction pipe from the pump to the bottom outlet valve also known as Fv1
- Note: Most valves not only act as feed valves but they also act as outlet valves eg. Bottom feed valve Fv1
- Connect discharge pipe from pipe to storage vessel and follow the correct earthing procedure
- Pump out bottoms until the kettle is completely empty
- If a different product will be loaded next operator must perform two kettle washings (depending on the product), if not then operator can proceed to load the next batch
- Pump 500litres of clean water into the kettle
- Heat up plant, open steam crown valve and the steam regulator valve
- Set steam pressure at 100kpa
- When the distillate starts to flow, close steam crown valve and the steam control valve
- Cool the kettle until the top kettle temperature is 65DegC
- Drain the kettle following the standard earthing procedure
- Repeat this process for the second time depending on the product
Notes
In a case where bottoms are supposed to be drained into the Black tank, follow the following steps:

- Ensure that feed valves 1 and 2 (FV1 and Fv2) are closed
- Open outlet valves 3 and 4 in image 2 above
- Open Feed valve 3 (Fv3) on the Black tank
- Note: All feed valves are named as feed valves given the fact that they are inlet valves for that specific vessel e.g. The Column plant has 3 feed valves namely Fv1, Fv2 and Fv3 and so does the Black tank or any other vessel that has inlet valves.
- Black tank can only accommodate a maximum of 10 000litres
- Monitor the amount of product going in the Black tank from the kettle by looking at the column plant's measuring gauge
- As soon as the measuring gauge shows that there is no product left in the kettle, close outlet valves 3 and 4
- Close Black tank feed valve 3 (Fv3)
- Wait until the top kettle top temperature is 65DegC
- Pump out the remainder of the bottoms from the kettle to the Black tank
- Connect suction line from pump to outlet valve (Fv1) of the column plant
- Connect outlet line from pump to Black tank feed valve 1 (Fv1)
- Open the Column plant outlet valve (Fv1)
- Open Black tank feed valve Fv1
- Turn on pump
- Pay attention to the sound of the pump
- Once the kettle is completely empty, turn off pump
- Close Black tank feed valve 1 (Fv1) immediately
- Remove suction line from Column plant outlet valve and leave open
- Now the Column plant is ready for a new batch
